

WRITINGS
Anatomy, Philosophy, Breath and Posture Resources for those interested.
A Deep Dive into Yogic Breathing
Often, breath training starts with letting go, laying down and relaxing abdominal muscles to feel the belly rise on the inhale and recede on the exhale — something called "belly breathing."
However, this is not the only way to breathe. There are many other steps that follow, which have been deeply understood with the yoga tradition. For instance, drawing the breath up the spine and into the heart can help with upright posture, and support the spine through a full range of motion (think Cirque du Soleil backbends)!
Integrating "Bandha" is the process of refining your breath, both for meditation, posture, and suppleness within movements. The spinal wave presents the perfect conditions to develop these sweet subtleties.
An important next step is "breathing into the lower back" — most easily felt in spinal flexion.
Next, we learn to expand the ribcage, something called the "Upward Flying energy lock," or Uddiyana Bandha in Sanskrit.
This matures into something the yogis call "Maha Mudra," or "The Great Gesture" in English... In Anatomical terms, it is Axial Extension, which is a reduction of the curves of the spine that creates more space between the vertebrae, coupled with the sense of lengthening up through the crown. This brings an alertness and relaxation to practice, and is the foundation of strong postures like handstand/headstand, and using the breath in meditative ways during Pranayama, resting the mind in the calmness of the inner breath called “prana”
The Internal Winds (vayus)
PRANAYAMA is the traditional practice of working with the subtle energies of the body. Yogis of old times conceptualized three main energy channels that flow up the spine, from the pelvic floor to the head. The Ida Nadi, or moon channel, corresponds to the left nostril being more open and more receptive states of mind. By contrast, the Pingala Nadi ends in the right nostril and is characterized by faster decision making, and sometimes lends itself to arrogant states of mind or self-assuredness.
When the energy is balanced through pranayama practice, it effortlessly flows through the central channel, Susumna Nadi, which Hatha texts idealize as pure perception, moment to moment awareness, or even Samadhi, one of the deeper states of yoga that is the fruit of meditation.
Prana, the energetic flow of the breath, is subdivided into five categories of vayus (inner winds), one of which is confusing also called Prana. The main two we concern ourselves with are Prana and Apana, as they are the most readily workable and can easily be felt with the help of a few asanas (postures).
Postural qualities of the breath
PRANA is the pattern related to inhaling, backbending, opening into the unknown. It has an energizing quality that awakens the mind. Beginners are often taught this pattern. It is a useful approach to teach stiff people doing basic asana and exemplifies a basic stretching technique called reciprocal inhibition. Without the balance of apana, trouble can arise in weight-bearing situations and more intermediate asana.
APANA is the exhale pattern. It tends to make you contract and can bring stability back into many types of movements. It can be experienced actively as in high plank, or as passively slouching when the mind is distracted. Very often, the apana is overlooked in the pursuit of the aesthetic one might associate with ballet (shoulders away from ears, and heart lifted), yet apana is the grounding pattern that supports the hip joints and shoulders properly when it is blended with the prana pattern.
The prana and apana system studies these extremes as separate, so they can be rejoined like two long lost lovers. This joining of patterns makes asana practice pleasant, meditative and less stressful on the joints to prevent common injuries. As these energies are joined, co-activations of opposing muscle groups are formed across most major joints to increase stability within range

Scoliosis and Yoga: My journey in healing
Over the years I have developed my own way of doing yoga for scoliosis... It's called:
"Pretend you don't have scoliosis, focus on your breathing and practice, practice, practice!"
Just because you can see that someone is crooked doesn't mean making it look straight is going to fix anything.
A very high level of body and core awareness is needed to refine postures in this way, rare in teachers, let alone students.
Fixing someone with scoliosis from the outside can also confuse their understanding of basic foundations, and throw them off course. Plus, we tend to overemphasize limited aspects of technique in Yoga classes as being really important, many of which I've found unnecessary or counterproductive.
At intermediate stages of practice, you can start to refine things. For instance, just because my right leg goes behind my head easier than my left leg doesn't mean I should exploit that asymmetry. It's often best to work more with what doesn't come as easily, or just don't do that extreme range of motion at all.
Another thing we have to look out for is excessive internal rotation in hamstring stretches, especially seated forward folds (such as triang mukai eka pada). Letting the leg be slightly turned out (external rotation) might be the proper condition of the posture to protect the hip joint. Keeping your back straight as possible in these postures is good advice when you're stiff, but gradually hurts the hip joint once you're flexible... Work with slower and fuller exhalations and abdominal power to round the lowback when your hamstrings are flexible (this is technique for handstand press as well).
And of course, if you do Lotus posture, alternate which leg is on top from day to day. Left leg up first with the left sit bone elevated on a towel, in my case, directs the expansion of the breath into restricted areas on my right side. Pretty cool stuff.
Let the hips move with you in all postures, and leave wiggle room between techniques. Be fluid in your postures and transitions. For me, this has been key to stop stressing the SI joint, which can over-mobilize by "keeping the hips fixed."
I owe my practice and understanding to the first teacher who stopped trying to fix me from outside and taught me to pay more attention to my breath. In essence she understood her role was to encourage and support a love for the practice. When it comes to posture and movement, a great teacher leads you to your own inner-teacher.

Pelvis Anatomy - Bony Landmarks of Alignment
The pelvis is the centre of gravity, and of prime importance to yoga practitioners. The position of the pelvis is affected by (and has an influence on) the rest of the chain above and below it.
The pelvis, sitting bones, sacrum, and more
The pelvis is the centre of gravity, and of prime importance to yoga practitioners.
The position of the pelvis can be influenced by how we contract muscles below it, such as hip extensor group which include hamstrings and gluteals (butt muscles). Likewise, the hip flexor group (psoas and rectus femoris) influence its positioning. It should also be noted that muscles which specialize in internal rotation of the hip and abduction can assist in tilting the pelvis forward (anterior tilt).
Muscles above the pelvis can also influence its positioning. Abdominal muscles can play a role in lifting the pubic bone and dropping the tailbone. Meanwhile, muscles that span the back of the spine (such as latissiumus dorsi, erector spinae and quadratus lumborum) may have the opposite effect.
Healthy movement involves a co-contracting of these opposing muscle groups. For this reason, it’s generally more helpful to reference bony landmarks in the study of movement, alignment, and in teaching yoga to other people.
I’ve provided some technical jargon below, but feel free to jump right into the 3D model of the pelvis.
Helpful Bony Landmarks of the Pelvis / Hip region include:
Sacrum - A flat bone situated below the lumbar curve, near the back of the paint-line (unless you have high-wasted pants, and who doesn’t in 2020). Directly above the sacrum is a common site of compression injuries, between the 4th and 5th lumbar vertebrae (L4-L5), up to the first sacral vertebrae (S1).
Tailbone - at the base of the sacrum / back of the pelvis
Pubic Bone - at the front of the pelvis, often referenced in opposition to the tailbone.
The SI Joint - we have one on each side of the sacrum (left and right), where the sacrum meets hip hipbone (illium). People mostly become interested in them when there’s pain. Such pain is somewhat common among practitioners who have leg length differences, and it’s usually only sore on one side. Such potentials can be aggravated by fixing the hips in asymmetrical movements and twists, and often avoided by letting the pelvis move with the spine. Another key area of focus is glute training, not just of glute maximus, but the smaller musclies like glute medius and minimus.
Sitting Bones - more accurately called “ischial tuberosities,” these bony bumps are what you feel when you can sit truly upright. All the hamstrings attach at the sitting bones, so many yoga practitioners injure them by “lifting the sitting bones” too much in poses like donward dog. This can be corrected by contracting the glutes and abdominals, imagining the tail was heavy (slight posterior tilt of the pelvis)

3D Models of Breathing
Movement of the Diaphragm and Breathing Dynamics
Breathing is the act of inhaling oxygen and exhaling carbon dioxide.
During inhalation, the diaphragm contracts and moves downward. At the same time, the intercostal muscles, located between the ribs contract, expanding the ribcage laterally, out to the sides and upwards. These actions increase the amount of space in the thoracic cavity, enabling the lungs to expand.
The contraction of the diaphragm happens automatically, since the atmosphere has a greater pressure than the lungs, and gasses naturally move from areas of higher pressure towards areas of lower pressure. As anatomist Leslie Kaminoff has said, “The Universe breathes us.”
Chest movement during breathing helps move air into the alveoli (air sacs) within the lungs so oxygen-carbon dioxide gas exchange can take place.
Since the inhalation has resulted in increased pressure in the abdominal cavity (think of air compressed gas), the exhalation occurs automatically as the diaphragm relaxes. The act of expelling air can also be assisted by the abdominals muscles (all four of them), which are commonly referred to as “muscles of forced exhalation.”
3D Models of Breathing
Click the 3D model below to begin:
Use the arrows on your keyboard for rotation.
You may also pan up, down, left and right using the W-A-S-D keys.
Select any part of the body to view it’s anatomical name.

"Hatha Yoga, Vinyasa, Ashtanga, what's the difference?"
“Hatha is gentle, vinyasa is more flowy, and ashtanga is vigorous and athletic.” All of those responses reflect a common misunderstanding on what the terms actually mean…
I get question a lot — especially because I run a Vinyasa Yoga Teacher Training (YTT)…
The short answer:
"They are all the same."
The more modern answer:
"Hatha is gentle,
vinyasa is more flowy,
and ashtanga is vigorous and athletic.”
All of those responses reflect a common misunderstanding on what the terms actually mean.
In truth, Hatha can be quite forceul, and ashtanga can be incredibly slow and meditative. And yet people often have the complete opposite experience in yoga studios
What is Hatha Yoga?
Hatha is a word that refers to a traditional 14th century text we study in depth, the Hatha Yoga Pradipka, which translates to "Light on Sun-Moon Yoga." This includes a variety of forceful (not gentle) techniques to liberate the energy system and free the mind from its conditioning. Including breathing techniques and challenging yoga postures like arm balances.
What does Ashtanga mean?
Ashtanga means "8-limbs," which refers to a holistic way of living, founded on the principle of non-violence (ahimsa), self-study and meditation. Among the 8-limbs are breath-control (pranayama), comfortable posture (asana), and concentrating a distracted mind so it is fit for meditative insight.
What is Vinyasa Yoga?
Vinyasa simply means "to place in a special way," the intention behind the ritual.
In modern times (1930s onward is my best guess), the word was given a new meaning to refer to:
"linking breath with movement in a special way,"
like when you inhale your arms up in a sun salutation, and exhale to fold forward looking at the navel.
How did Vinyasa become a pushup in modern times?
At that time, Krishnamacharya had developed an entire flowing yoga system based on this interpretation of Vinyasa. Years later, he put one of his long-time students Pattabhi Jois in charge of teaching this system, who later branded this method as "Ashtanga Vinyasa Yoga." This system involves a sequence of progressively challenging postures, strung together on the breath. It starts with Sun Salutations, a flow of nine postures on the breath, which becomes the foundation of the whole asana practice as practitioners gradually integrate more seated poses, backbends and inversions. Between each posture, a sun salutation vinyasa is performed - so for convenience sake, people started saying, "take a vinyasa," and through years of broken-telephone, this has been understood as flowing through chaturanga, updog, and downdog... Quite a departure from the original sentiment, but the shift started on Indian soil.

10 Things to know about Ashtanga Yoga
1. Yoga is a 24 hour a day practice:
Ashtanga is a term that means “eight-limbs,” which first appeared in the Yoga Sutras of Patanjali, a text composed around 300 AD. At this point in history, there was no discussion of specific yoga postures (asanas). Asana was defined in terms of internal awareness (Sutras 2.46-2.48).
“Relaxed but alert, allowing for meditation on the infinite (ananta) to arise spontaneously and unceasingly… Unbothered by qualitative judgements such as good or bad, pleasure and pain.”
The other eight limbs of Ashtanga include compassion, ethics, contemplation, breath/subtle energy (pranayama), mental focus and meditative insight (samadhi). Together the eight limbs form a full toolbox to wake us up, so we can see beyond our habitual trappings and get a clearer perspective while permitting others to do the same.
2. Moving Meditation and Energy Efficiency
A practice built only on asana has similarities to other forms of exercise. There are at least a few defining factors that separate a healthy Ashtanga Vinyasa practice from aerobics: mainly the emphasis on breathing with smooth sound and meditative focal points (drishti) for the eyes to rest in each posture. This asks that you seek the relaxation even within your strongest efforts, and prioritize focus on the breath to ensure you are working intelligently.
In Vinyasa practice, we learn to link each movement with its complementary breath cycle. After some months or years of practice, a new stage of proficiency is developed where movements may be linked with their opposite breath cycles – this is how core stability is developed, also called valves or bandhas. Too much emphasis on core in the beginning can be a major obstacle to meditative awareness and opening the body, just as being too lackadaisical about things makes progress impossible. Within asana practice there is a blending of opposing forces related to posture and breathing, both of which are endlessly subtle and become imperceptible even to a trained eye.
Many older yoga texts composed by great masters describe a state of inward and outward stillness where it is no longer possible to tell if someone is inhaling or exhaling, because the breath has become so slow and subtle. This can serve as a reminder that techniques are just tools to guide the journey—at some point, all techniques can be abandoned.
3. The Sequence isn’t Perfect – But Practice makes it better.
We all have a unique life history, different strengths and weaknesses. Some of us may find the traditional series to be perfectly balanced, others may find it helpful to practice therapeutic exercises before or after practice.
Most of us can expect to modify postures quite a lot, and the tradition encourages that. Some teachers may even suggest you add postures to your first series practice that appear in the second series (such as backbends), to counter-balance. Your teacher may ask that you modify postures in ways that are completely new to you to wake up a body awareness that will serve you elsewhere in the practice. It’s important to find one you can trust.
4. Find an experienced teacher who has a daily Ashtanga Vinyasa practice that you can trust and see regularly:
Whatever you do, don’t learn from a video or a book! There are many qualified teachers out there, despite how difficult it is to become fully certified by the Jois family in Mysore, India. It probably takes at least 5 years of daily Ashtanga practice and regular teaching (at least two classes per week) to become a proficient teacher of this intricate style, so be sure to ask those questions of your teachers.
5. Origins of the Ashtanga Vinyasa Practice:
Ashtanga Vinyasa Yoga is a brand name given to a sequence of movements of mysterious origin. It’s hundreds of years old, but the scriptural evidence was eaten by ants, some say. Others point to evidence that Krishanamacharya, the godfather of modern yoga, invented the practice around the 1930s, mixing ideas from traditional yoga philosophies with inspirations from the Danish gymnasts who shared a practice gym provided by the Maharaj of Mysore, one of India’s royal families who upheld a deep appreciation for fitness systems practised around the world.
6. Less is more:
Fewer postures practiced on a semi-daily basis, even if only for 20 minutes each day, is better than trying to do a full hour practice once or twice a week. The big emphasis is on memorizing the beginning of the practice, which starts with sun salutations, then growing the number of asanas in your practice over time (if desired). Your own breath and energy rhythms (prana) become the guiding force, rather than some external authority figure like a yoga instructor. Though it can be awkward at first, this method tends to result in a deep appreciation for the subtleties. Plus, if you get bored, you can direct the theme of your practice. Maybe you focus intensely on alignment one day. Another you focus more on the drishti and breathing. Another day you can focus more on vinyasa, linking the breath and movement the ways its traditionally prescribed without taking any extra breaths or adding unnecessary movements. Then after being so studious, treat yourself to an experimental day where you try on new alignment patterns or zone on certain postures you find challenging.
It also helps to apply less intensity of effort within the asana practice. Practice in a way that you really enjoy it, every time. For most of us this means showing up regularly, and experimenting within the formulas of “ease vs effort” to avoid over-stretching and overly-tensing the abdominal core.
7. The Balance of Push and Pull
Muscle imbalances can arise from too much strengthening around a joint in familiar ways without sufficient counter balances. One popular example cited in the Ashtanga Primary series is too many push exercises for the shoulder (ie: plank, floating through to sitting) and not enough pull (ie: cobra, pull-ups, resistance exercises like rowing). This may not be an issue in the first decade of practice, but many dedicated students find a little resistance training can go a long way. Resistance bands are inexpensive and simple ways to train the rotator cuff. You don’t even need to invest in a pull-up bar, there’s plenty of them at kids playgrounds.
8. Progress is an inside job.
Sure, there’s physical gains in terms of strength and flexibility, but at some point you’ll plateau—then what? Your ability to consistently practice the eight-limbs of yoga (ethics, meditation, self-study) is probably a more reliable measure of whether the asana practice is serving you well. We all know yoga isn’t about making an asana of yourself, but how quickly we forget when presented a sequence of progressively challenging postures.
9. Correlation does not equal Causation:
A common mistake people make (especially yoga teachers) is assigning blame to a particular movement in the practice. Some asanas may aggravate your injury now, but as the old saying in academic research goes, “correlation does not equal causation.” Unless you wear a lab-coat to work and study fresh human specimens running on treadmills, you’ll be hard-pressed to establish any link.
Rather than looking for a movement or practice to blame, our energy is better invested in everyday mindfulness. How do we use these bodies during everyday activities? Do you bend your knees to tie your shoes or pick-up your kids? Do you always use the same arm to open a door? When walking up the stairs, do you always lead with your right leg? What kind of shoes do you wear? Even sleeping is an asana, just not a particularly good one.
When we become conscious of our movement patterns in daily life, postures that we thought were impossible or dangerous may become accessible, comfortable and easy to do without even warming up.
10. You should probably just keep practicing.
It's natural that you’ll have days where you don’t want to practice – and it’s usually a good idea to do it anyway.
You never really know where the edge is until you’ve gone too far. Repetitive stress injuries don’t show up the first time you do a chaturanga, it can take thousands or millions of repetitions of familiar movements before things start to derail. Practice when you’re injured and you’ll be forced to modify more than you would otherwise. This can open up new depths of alignment patterns, similar to how a good personal trainer doesn’t push clients to lift heavy weight, but will usually take some weight off the bar to develop better form.
~ OM ~

Breathing and core strength, in posture and everyday life
Core is so much more than abdominals. Breathing is integral to posture, strength and relaxation, and exploring this connection in greater depth can give us energy to move through our mat practice (and everyday life) with grace and ease.
What is Core Strength?
There is no fixed definition of Core Strength, and any different opinions exist. We could think as core stability as “the ability to return to neutral posture, controlling the force produced by core strength.”
Core strength:
The strength of the underlying muscles of the torso, which help determine posture.
The ability to produce force with respect to core stability.
Core stability:
The capacity of the muscles of the torso to assist in the maintenance of good posture and balance,
especially during movement.The ability to control the force we produce.

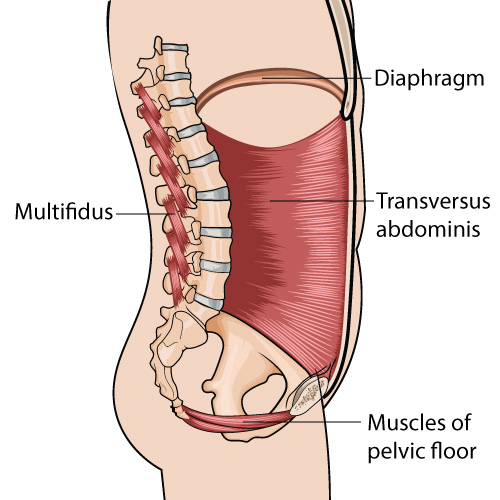
Four Layers of Abdominals
One popular myth I’d like to dispel is that abdominal crunches comprise core strength — these exercises are valuable in small doses, but done to excess only overwork the most superficial layer, the six pack, also called rectus abdominus. Conversely, the transverse abdominus (TA) comprises the deepest layer of the core (closest to the spine). It is part of the deeper core, which fires up in anticipation of the movement to come. Studies have shown that among those who suffer from lower back pain, the TA is not firing in a timely fashion.
Six Pack Abs (rectus abdominus) are a component of superficial core = closest to the surface. They become dysfunctional when they are trained as prime-movers in isolation from the rest of the body (as in sit-ups). This can flatten your natural lumbar curve, mis-align the disks and compress them. Healthy abdominals are meant to work as back stabilizers - they support and protect the lower back.
Obliques (internal and external): Involved with rotation and side-bending (lateral flexion). These lie closer to the spine than the rectus abs. The obliques can also be used as muscles of forced exhalation. When they tone to much, this can inhibit the ability of the diaphragm to guide efficient respiration, setting off the fight-or-flight response. But among those who have mastered breathing, the obliques can be used without having a negative impact on the function of the diaphragm.
Transverse abdominus (TA): The TA is like a corset that stabilizes the trunk,and plays a major role in healthy movement. Transverse abdominus is part of the deep core musculature, which means that it’s closer to the spine and plays a great role in stability. Although the TA is involved in all healthy movements, one of it’s more notable qualities is allowing us to maintain the natural curves in our spines while tensing around the abdomen.
In more relaxed yoga postures, we isolate the lower portion (below the navel and above the pubic bone) from the upper fibers. This is confusing either called mulah bandha (root lock) or uddiyana bandha (diaphragm lock) by different teachers of the same traditions. This problem comes down to more than language games - there are at least two ways of applying each type of bandha in the body, which I’ll be disucssing in my next blog post.
Deep Core Strength
Deep core refers to muscles closer to the spine itself which will play a strong role in stability, protecting the joints as we work with forces our bodies create or interact with outside forces.
The following three deep core connections work in concert to create stability BEFORE the movement occurs.
The transverse abdominus (described above) is the only of the four abdominals layers considered among this category. Like a corset, in wraps the torso with most it’s fibers running horizontally.
The multifidus are stabilizing spinal muscles that run the length of the spine, close to the midline. They stabilize each individual vertebrae to prevent disk degeneration that can arise from too much movement in any one joint. Healthy movement involves a little bit of movement in a lot of different places.
The pelvic floor is the floor of the core. It tones to help keep organs in place. When it is weak or dysfunctional, the body is unable to safely generate intra-abdominal pressure. More on that below.
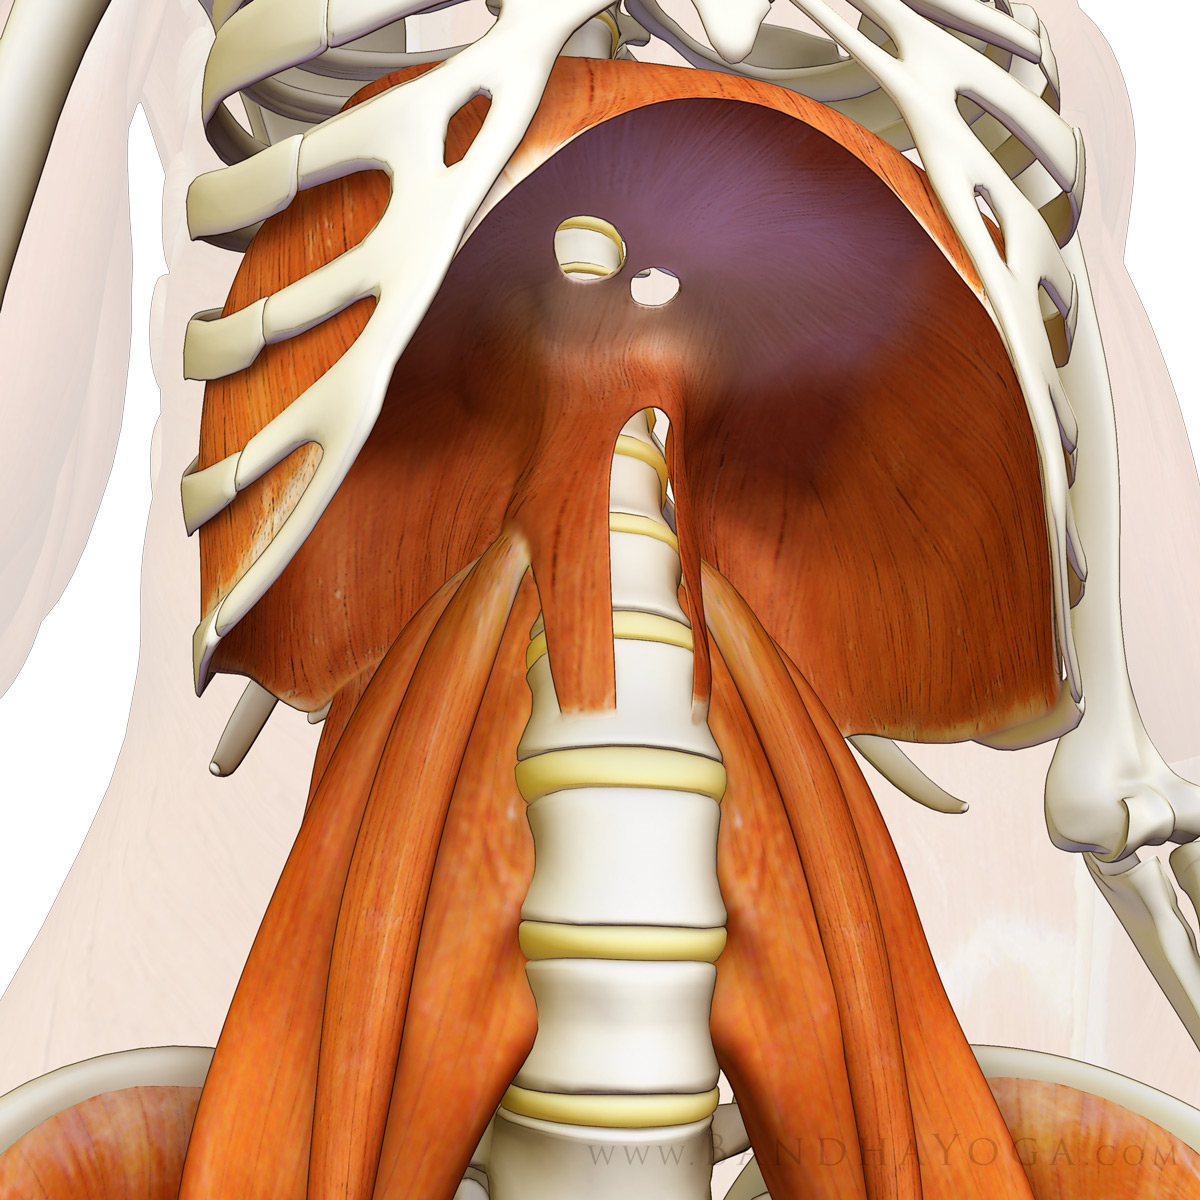
The Diaphragm
The Diaphragm is the main muscle of breathing. The diaphragm contracts automatically to draw in oxygen when we inhale. While we generally don’t control the action of the diaphragm, we can learn to regulate how quickly it contracts or releases by working with the pelvic floor and muscles in the throat.
Advanced breathing exercises in yoga (kriyas and pranayama) may involve inhibiting the diaphragm while holding the breath out, or slowing it down using abdominal core muscles and other accessory muscles of respiration around the shoulders and ribs — this is one of the reasons why pushups are a pre-requisite to advanced breathing techniques.
In movement practices, we can take advantage of the pressure changes created by inhaling to protect the spine and perform physically demanding exercises with greater ease. This technique is referred to as generating intra-abdominal pressure. The basics of this technique start with breathing slowly into the abdomen while doing push-ups, or lifting into crow pose, a form of mulah bandha. A more advanced application of mulah bandha involves breathing in less than 20% of one’s available capacity while lifting into a handstand, and then holding the breath. This makes the body much lighter, and also offers protective benefits around the lumbar spine.
A tight psoas will effect the position of the lower back, and prevent the back portion of the diaphragm from expanding properly. This can often be seen as bulging the belly out on an inhalation, or felt as a more shallow breath that expands the chest.
Releasing the psoas allows the inhalation to gently expand the lower back. The resulting increase in intra-abdominal pressure offers protective benefits for the lumbar-sacral area, and makes the body feel lighter in weight-bearing movements. Gentle breath linking movements are the ideal training group - the practice of vinyasa yoga.
The Psoas
The psoas is an often overlooked part of core strength. It attaches from inside of thigh bone (femur) to the lower back (all lumbar vertebrae) as well as the lowest thoracic T12. The psoas is often thought of as a hip flexor, commonly weak, tight, and dysfunctional from too much sitting. Research shows it can also act as a hip extensor in some individuals, depending on which vertebrae it attaches to. Because of this contradiction, researchers classify it as a core stability muscle.
The muscle of floating that allows fluid, flowing movement, like water. A healthy psoas is both flexible and strong. It always maintains resting tone, and functions both in core stability and as a hip flexor in the walking-phase. It also can function as a very weak external rotator.
Excessive tone is released when a harmonious relationship is found between alignment and stability, recruiting the deeper core muscles mentioned above, along with hip extensor muscles (hamstrings and gluteals).
Pelvic Floor
As the floor of the core, the pelvic floor muscles also need to be trained to acquire the right amount of resting tone. The most common mistake is “pushing down” as if going to the bathroom. In some situations, kegel exercises can be helpful, but they don’t guarantee the correct type of recruitment of the musculature.
In basic terms, create the sensation of an upward squeeze in the pelvic floor. Focus on this while exhaling. Traditional yoga texts like the Hatha Yoga Pradipika offer the imagery of breathing up the central axis of the spine, from the pelvic floor up through the throat or crown of the head. This notion of drawing energy up the spine on inhalation is a sure sign of a toned pelvic floor.
Cues for deliberately activating the pelvic floor can be helpful in the beginner. They also differ between men and women due to anatomical differences:
For men: Imagine “sending the boys home,” lifting the testicles. Another cue is to “shorten the shaft.”
For women: “Think of vagina as a clock with 12 at the pubic bone and 6 at the tailbone; also imagine the sides the sides of vagina as 3 and 9… Draw 12 to 6 and 3 to 9.
For everyone: “Imagine the pubic bone and tailbone dropping in relationship,” as Richard Freeman says.
A well-trained pelvic floor has a natural resting tone. Once it’s been trained to go online, it is not necessary to think about it. Consciously squeezing the pelvic floor muscles can be a helpful strategy in the short-term, but over the long-term we can let go of any technique and simply focus on breathing up the central axis, as in the various forms of uddiyana bandha I’ve described in other blogs here.
It’s equally important to do restorative practices where the body is fully supported, and you can focus on consciously relaxing the pelvic floor.


Integrating balanced strength in Sun Salutations
Surya namaskara loosely translates to “sun worship,” and when we move with the grace of someone absorbed in worship, with a gentleness, subtle muscular and energetic connections in the whole body begin to awaken that support a strong and relaxed handstand.
Developing an Arm-Balance in Sun Salutations
There are many different techniques that can be explored within any yoga posture. Sun Salutations are commonly practised in many styles of yoga as a warm-up at the start of class. For this reason, it’s common to overlook their usefulness in progressing towards stronger movements like handstands, crow pose, and backbends. Strong poses don’t have to be hard or strenous - surya namaskara loosely translates to “sun worship,” and when we move with the grace of someone absorbed in worship, with a gentleness, more subtle muscular connections in the whole body begin to awaken. We can really notice what is happening moment to moment, gradually bringing together large patterns of opposing actions throughout the whole body, and the energies they characterize.
Here are some connections to explore in the practice of Surya Namaskara A.

First Movement (ekam):
Spread the arms like wings (to broaden the collar bones), then reach forward around shoulder height (serratus anterior activation) spreading the shoulder blades…. Press the hands together to engage the chest. Lift the chin behind the arms, as Richard Freeman cues.
Second Movement (dve):
Place the hands on the floor 6 to 12 inches in front of your feet. The hands should be the same distance apart that you use in high plank – roughly shoulder width.
Third Movement (trini):
Keep the hands on the floor and lift the heart and head slightly. This is often called a half-lift, but don’t take the name too literally. Quarter lift is enough. Breathe in about 20% of your capacity and push into the hands, leaning the shoulders past the wrists. This is the breath of floating, so if you don’t float, step back to high plank instead, or jump once in a while.
Chaturanga (chatvari):
Exhale as the elbows bend, moving slowly into chaturanga. Its important to take your time here and hangout in this beautiful pose. Then slowly lower your knees right before the next position.
Fifth Movement (cobra-dog):
With the knees down, elevate the shoulders mid-way to the ears, and then PULL BACK (engages middle trapezius and rhomboids). Ground strongly through the index finger mound to engage the pecs. Pulling with pec strength co-activates both sides of the joint well to create a shoulder bandha. The shoulders should be slightly elevated to avoid overuse of the latissimus dorsi.
Sixth Movement (wavy dog):
Exhaling, tense the six-pack to curl into downdog. Breathe slowly with ujjayi in downward dog and experiment with different breath patterns. Who says you can’t teach an old dog new tricks? Can you connect to the external rotators to broaden the collarbones (outer edge of hand). Can you ground the index finger knuckle and lift the arms away from the floor (middle-trapezius and rhomboid activation). Can you play with letting the shoulders lift to the ears while keeping the neck soft? Or is breathing into the lower back and looking at the navel a new connection for you? Get to know all the breeds of dogs out there.
Waves into Frog:
On the last exhale, use the spinal wave, propelling the shoulders over the hands, then exhale to bend the knees and look at the thumbs.
Seventh Movement (supta):
Leap frog on a slow inhalation, jumping behind the hands, or work towards whatever relationship you had between your feet and hands in the second and third movements (dve and trini). Think in terms of only breathing into 20% of your capacity when jumping forwards. Save some gas for the landing and move into the half lift.
Eight Movement (asta):
Exhale to curl in, looking towards the navel.
Ninth movement (nava):
Dig into the heels to come up with strong hamstrings and hip extensors. This strength counters the strength of the psoas in handstand so we don’t overuse the hip flexors. This is also the power that lifts the legs into handstand, headstand and forearmstand. Glute strength, while important to cultivate for general hip health and stability, is not the main lifter of the legs in handstands and inversions.

Downward Frog
Not a real pose, but it contains the alignment of a handstand:
1- Chin behind the arms
2- Shoulder blades lifting up towards the ears.
3 - Shoulder girdle also lifting towards the ears
4 - Chest contracted
5 - Spine neutral (with slight extension)
6 - Legs toned and hips turned out, which is a valuable positioning for the early stages of hopping into inversions life headstand and handstand.

Cultivating a Healthy (arm) Balance
For optimal shoulder health, it’s important to cultivate a co-activation of opposing forces around the joint - balancing the muscles that push and pull, that protract and retract, elevate and depress… In this article, we’ll break them down, so they can be re-united like long-lost lovers.
“One should always be able to reverse the action that creates the pose.”
An arm balance is any posture where the hand or forearm are pressing against the floor to support the weight of the body.
As children, the first ones we learned involved crawling (table pose), then we learned to push ourselves up to standing, often falling over along the way (downdog). Later as adults or enthusiastic yoga practitioners, we re-familiarize ourselves with weight-bearing through simpler hand-balances like table and puppy-dog.
Once these basic forms of sun salutations (surya namaskara) have been memorized, we can experiment more with vinyasa – flowing on the breath with stability and momentum. Fluid movements through the spine are integral to developing or health in the spine and other joints. Flexibility really needs to be balanced with strength, which is the foundation of vinyasa yoga, and distinguishes it from passive forms of stretching like yin yoga (which are useful as complementary practices).
Arm balances involve a co-activation of opposing forces around the main joints involved.
When talking about upper-body strength, this involves the shoulder, elbow and wrist. For our purposes, we’ll mainly consider how to create a stability around the shoulder, also called a “shoulder bandha,” by giving attention to muscles in the spine and shoulder that are used in pushing and pulling movements. One example of this is co-activating the lats and pecs, or as Simon Borg calls them, “the under-arm muscles.”
It’s helpful to study pairs of opposites separately, so they can be re-united, like two long-lost lovers.

Muscles used to Pull
Note that two of the “pull muscles” also retract the scapula (draw the shoulder blades closer together). They are the rhomboids and the middle trapezius which lies a little closer to the surface.
Rhomboids: between the upper spine and edge of the shoulder blades
Posterior Deltoid: back of shoulder
Latissimus Dorsi: large back muscle spanning from your sacrum, hip, low and mid vertebrae to the back of your upper arm
Teres Major: a small muscle attaching to the back of the upper arm and shoulder blade
Middle Trapezius: back muscle that spans from the base of the skull across the top of the shoulder blades and attaches to all the neck and thoracic vertebrae. it is divided into thirds, which each portion participating in differing and overlapping actions. The middle trapezius, which lies above the rhomboids, is the section used in pull movements like chaturanga — this is important because we practice it over a hundred times in most flow classes. The upper-trapezius gets a bad reputation for being a “shoulder-shrugger” that stiffens up the neck, however, it participates with other players in a solid handstand.
See this blog by a circus performer who is also a physiotherapist for a comprehensive take-down of why it’s a bad idea to “draw the shoulders away from your ears” in overhead positions like downward dog, handstand, etc.

Muscles used to Push
The same muscles used in the push phase of movements also protract the scapula (spread the shoulder blades apart). This why people who bench-press lots of weight have huge pectorals and highly developed serratus anterior muscles, but may have great difficulty in retracting the scapula (drawing the shoulder blades closer together).
Pectoralis major:
also ADDucts the arm and internally rotates the shoulder - push into your index finger knuckle to turn it on (cobra, chaturanga, etc)
Serratus anterior:
also assists in upward rotation of scapula (as arms reach overhead as in moving from updog to downdog, or press to handstand)
Integrating balanced push muscles
Full crow has many of the same foundations as high plank. The spine is fully rounded (spinal flexion), which involves a strong chest and abdomen.
The first step is protraction of scapula (spreading shoulder blades) is performed by serratus anterior, often called the MVP of shoulder stability.
Actions to wake-up serratus anterior:
One of my favourite cues to activate serratus anterior comes from Mary Taylor:
“Imagine knocking on a door, but instead of using your fist, use the elbow.”
Visualize the general position of this muscle, and see if you can feel a tightening under the armpits. This works very well in seated forward bends like Janusirsasana as well, where you could even press the elbows into the floor if you’re hamstrings are flexible.
Another simple cue comes from Simon Borg:
”Take the shoulders forward”
In positions that involve reach the arms overhead (shoulder flexion) — like downward dog, extended side angle, or ekam in sun salutes — this simply means not going into your full range of motion (backing away from full shoulder flexion).
Training the Rotator cuff

No conversation about the shoulder joint would be complete without mention of the rotator cuff. The rotator cuff is comprised of four muscles that form a "cuff” around the shoulder joint. They contract to keep the head of the arm-bone (humerus) stabilized within the extremely mobile shoulder socket. Two of the rotator cuff muscles are external rotators of the shoulder, another is an abductor (ie: warrior 2) and the last is an internal rotator involved in pulling.
Putting the “pull” in your practice results in better quality chaturanga (low plank), a more stable shoulder position that is resistant to injury, and progression towards healthier backbends where the whole spine is involved, rather than only bending from the spine’s more vulnerable areas (lower back).
How to activate external rotators of the rotator cuff:
1) Pull the Band Apart:
Start training the recruitment of shoulder external rotators (two of which are rotator cuff muscles) by holding a resistance band with both hands, elbows in by the sides of the body… Engage the back of the shoulders and keep the elbows fixed as you try to pull the band apart. Get a sense of broadening across the collarbones.
2) Overhead Range:
Strengthening the rotator cuff’s external rotators in the overhead range of motion (ie: downdog, handstand). While resistance bands are incredibly useful tools, we can also rest the pull of gravity in positions where the chest faces the floor. We used the puppy dog pose with the palms facing eachother and elbows straight, and then lifted the arm away from the floor.
With practice, the muscle memory is trained and you’ll be able to recruit the external rotators along with the middle-trapezius (which was a pull muscle / scapula retractor) in downward dog, full wheel, and…. You guessed it… Handstand.
Integrate the pull muscles in your chaturanga and backbends:
Practice cobra pose in place of upward dog – bend the arms and pull yourself around a slippery floor with a blanket under your hips. Once developed in cobra pose, these pull muscles can be recruited in chaturanga for a more balanced strengthening around the shoulder girdle (rather than front shoulder dominance).
Postures to explore the shoulder bandha:
recruiting opposing muscle groups
With practice we can learn to activate serratus and the pull muscles (scapula retractors) in a way that lifts the entire ribcage away from the pelvis.
Here are a few different ways to develop the shoulder bandha, subtle balance of oppositions:
Chaturanga Push-ups on the knees. At the bottom of the push-up, engage the scapula retractors to open the chest like a backbend, and then push away from the floor to re-recruit serratus anterior. As you alternate between bending and straightening the arms, try to maintain a gentle contraction of the opposing muscle group… As Richard Freeman says, “It’s like making a smoothie - blend to taste.”
In puppy dog (and eventually downdog) we can also play with the outer edge of the hand rooting to recruit external rotators (including the rotator cuff). Then try the opposite way, with the index finger knuckle rooting to engage internal rotators (the chest) and lifting the arms further away from the floor (middle-trapezius, a key connection).
In Janusirsasana, hold the foot and explore pressing the elbows towards the floor to spread the blades (serratus anterior). Then try the opposite way, lifting the elbows away from the floor to recruit the upper-back muscles that retract the scapula.. In other words, balance the muscles that take the shoulder forwards (flexion / scapula protraction ) with those that lift the shoulder away from the floor (extension / scapula retraction).
These co-activations are also used in breathing exercises like Uddiyana Kriya (abdominal vacuum), and even the Nauli Kriya (abdominal roll).
These anatomy focused articles by Dr. Ray Long that illustrates the shoulder concept below:

Serratus Anterior and the Rhomboids
PUSH & PULL
co-activating the expand the chest
Expanding the Chest in Sukkasana, by Ray Long
Cool tip for Deeper Breathing, by Ray Long
Final product: well-balanced handstand demonstrated by Mark Robberds
Take a moment to read about this approach to handstand - this same action can be develop in downward dog, which is really the key playing ground to wake up these connections in the body. You’ll notice some key differences in this approach to shoulder recruitment
Shoulders elevated (towards ears):
Upward rotation of scapula: the shoulder blades also lift up towards ears. A search of Scapulo-humeral rhythm shows why this is crucial in overhead moves.
Scapula retraction (subtle): middle-trapezius firing up.
Lastly, there is internal rotation of the shoulder (subtle): This happens automatically, no need to focus on it in practice. From a teacher’s perspective, it’s important to acclimatize our perspective and stop adjusting students shoulders when they present this way.

What does long-term success in yoga look like?
While it’s up to each individual to define success in yoga on their own terms, the practice of Hatha Yoga offers a unique perspective on balancing three pillars of health: the inter-penetrating relationship of steadiness of mind, posture and breathing.
While it’s up to each individual to define success in yoga on their own terms, the practice of Hatha Yoga offers a unique perspective on balancing three pillars of health: the relationship of steadiness of mind, posture and breathing.
So how do you define a good practice? It's obviously much more than just good posture. If yoga was merely about the poses, gymnasts would be the masters.
Integrating breath with large sets of alignment patterns is one unique characteristic of yoga. Hatha Yoga has a few definitions. “Sun and moon,” which correspond to duelling energy channels is one. “Forceful Yoga,” is another. Both definitions apply some internal tug of war between poles of opposites. The word yoga means “union” or “meditative absorption,” which tells us we have to make peace with the many contradictions that will arise in our own experience of something as externally oriented as perfecting posture.
“Every turn, every spiral, every extension has to be tempered by a counterturn, a counterspiral, or a flexion; sometimes strong, sometimes subtle.”
- Richard Freeman, The Mirror of Yoga
Here is a brief overview of how long-term success in Yoga practice can unfold. My hope is that you see your own ways of approaching practice somewhere in this tale, and get some insights into how to keep moving forward...
In the beginning, you walked into the yoga studio with your chest collapsed, shoulders and back slumping forward, and maybe you even had a strong superficial core (rectus abdominus) – the various elements that comprise this posture are coined the Apana pattern. When sitting on the floor, this tendency would be further exaggerated, then someone taught you to ‘lift your sitbones’ in downward dog, and finally, the stretch went into your hamstrings. You added bending your knees to the equation, and you were able to find your “neutral spine” and open your chest, instead of being in a slump.
You found this technique had portability to most other movements, and you learned to sit on the ground this way over the course of a few years. But you still find it difficult to sit-up straight, and your hip flexors are really sore, so you try to avoid that class where the instructor makes you do the boat posture (navasana) and other postures that demand you create a neutral spine while strongly flexing the hip. Sometimes those poses make your hip flexors even more sore, and you can’t figure out why they hurt your lower back.
You’ve been trying to squeeze your anus upwards when you practice yoga, even though it sounds a little weird. You’ve also learned by now that belly breathing is an incomplete technique, and so you keep your lower belly draw inwards about 2 inches below the belly button all the time—those boat poses aren’t so bad now.
A few months or years go by, you’re getting really good at touching your toes and breathing into your chest, ribcage and upper-belly simultaneously, but wondering why your upper hamstrings are sore, right where they insert near the bum – a common problem among yogis who take the Prana pattern of alignment actions to extremes for too long.
So you’ve started doing this thing in downward dog and lots of other forward folds where it feels like you might be “curling the tailbone”, and for some reason, the hamstring stretches feel way better. This is the beginning of merging the Prana and Apana patterns together.
A few more years pass, and you’ve realized that in downward dog and other hamstring stretches you can also engage your superficial core pieces like rectus abdominals, and contract your hamstrings and calves as they stretch (heavy hamstrings, rectus abs and exhaling the breath out are all part of Apana). When you do that, it feels like your hip flexors are relaxing for once in your life.
At the end of practice, you sit on the floor in that cross-legged position. You go through your usual motions to sit up tall: gently arching the back, shoulder blades down and back low belly in, pubic bone dropping so the sit-bones press down into the floor. You take a deep breath with sound and expand your chest, ribcage and upper belly, then with the exhale you contract 2-inches below the belly more firmly and then engage your rectus abdominus to squeeze out all the air. Then something happens… That area around the anus that you dogmatically contracted the last five years seems to engage on its own. At the same time, you feel the tailbone dropping in relationship to the pubic bone. The hip flexors are relaxed and the posture is stable and comfortable you could sit there for hours. You feel the root of the spine tone with the end of the exhale, then are able to meditate on the residue of that toning while inhaling.
A deep sense of calm overtakes the nervous system. The breath slows to epic proportions. There is a sense of energy rising from the root of the spine to the crown of the head. The alignment patterns of Prana and Apana have been fully balanced in the seated position. What once seemed like a bunch of overly-mechanical instructions on how to do everything from touching your toes to reaching your arms up reveals it’s brilliance as the art of yogic meditation on the entirety of hatha yoga: uniting the dualities of the inhale pattern (prana) and the exhale (apana), the left energy channel (ida) and the right energy channel (pingala), and experiencing their union through the central channel (Sushumna nadi).
After half-a-million chaturangas, it turns out that the keys to yoga we’re in understanding how to use your breathing and tilt the pelvis forward while dropping the tailbone, which didn’t make any sense until it finally happened, as the breathing technique triggered the “shadow side” of the alignment picture.
The breath continues to slow down, and without any extra effort, meditation on the infinite spontaneously occurs.
“Now is the time for yoga.”
- Sutra 1.1, The Yoga Sutras of Patanjali
Protecting the wrists in yoga practice
There are many sources of wrist pain in Yoga. This is one of those nuisances that can come and go as you add more and more tricks to your repertoire. I believe most these aches are due to misalignment and collapsing into the lower palm.
I frequently experienced this when I began a daily practice of Ashtanga Vinyasa yoga years ago. My practice now consists of more arm balances than ever, and there has been no recurring pain. I also use a paper thin Manduka Lite Travel Mat — it has no padding for falls, but a firm surface is ideal when you spend lots of time on your hands.
Arm Balances
Even Downward Dog is considered an “arm balance” posture. The importance of spreading the weight equally through the whole hand can be more quickly experienced when attempting an arm balance like Crow Pose or the Crane.
Check to make sure the weight is not being carried by the pinky finger side of the hand.
Share the weight between the upper and lower palm, though the upper palm generally can take slightly more weight.
Focus on pressing through the index finger, the mound of the thumb and the inner palm (external rotation of hand).
Also root down the knuckles where they connect to the palms.
Sun Salutations, Arm Balances and Sore Wrists
Let’s break down the various transitions (vinyasas) of the Sun Salutations – I hope this helps you isolate sources of pain in your yoga practice so you can stick with it!
Jump back vinyasas and wrist pain
In Sun Salutations, on the second vinyasa (movement) it is commonly taught to place the hands beside the feet as you exhale into a forward fold. If your hamstrings are very flexible or you are stepping back into high plank rather than jumping, this may help to align the shoulders right over the hands.
For students who are “jumping back” from the forward fold (fourth vinyasa), the full expression of the movement is locking the arms, then lifting the body half way into handstand with the legs straight, not bent. This requires a strong connection to the core strength of the body, but also requires the hamstrings be sufficiently warmed up, and quite flexible.
However, if the hamstrings are stiff, it will be impossible to bring the chest directly against the thighs in the forward fold, which lines the shoulders up, almost directly over the wrists. Tip the pelvis forward a little bit, so that the pelvis attempts to line up above the shoulders – here the shoulder can easily move too far beyond the wrist, creating an acute (less than 90 degree angle) between the wrists and hands.
A slightly acute angle is fine in arm balances — checkout the crane photo above and you’ll see the angle is more like 75 degrees — but if the angle is too small, it might hurt the wrist.
Be a champ and play safe by placing the hands a few inches in front of the feet for jumpbacks, still about shoulder width apart. Then take flight. This also may allow people whose hamstrings do not have the optimal level of flexibility to still attempt the jump back movement.
High Plank Tips
Press through the whole hand, but be sure not to take much weight in the pinky finger – the bones on that side of the wrist are sensitive. Root strongly through the index finger and mound of the thumb. This requires a conscious effort. Spread the fingers wide. Press through all the knuckles where they connect to the palm, but emphasize the weight around the index finger.
Keep the elbows lined up over the wrists when transitioning from high plank to Chataranga. Actively draw the shoulder blades away from the ears and eachother, as you would in Mountain Pose (Samasthitihi)
Chataranga Tips
As you lower from high plank to Chataranga and the elbows bend, the elbows should be lined up right over the wrists. If they are too far forward, this can strain the wrist. To keep the alignment as you lower down, strongly draw the shoulder blades away from the ears. The hips and chest come way forward while lowering, as the shoulder blades and the elbows are drawn back toward the hips.
If your wrists are sore an even better option is leaving out the chataranga for a while – simply stay in high plank then roll into upward dog if your back is flexible (that’s a recommendation from Richard Freeman).
Transitioning Safely to Upward dog
Lower all the way to the floor in chataranga. Knees, pelvis, and tops of the feet briefly rest on the floor. I find that 90% of the time, if students come all the way to the floor in Chataranga, the quality of the Updog improves so much that wrist pain is eliminated — and there is a much safer and deeper opening through the hip flexors, chest and shoulders. For this reason among others, I always emphasize coming all the way to the floor in Chataranga.
Pull your body forward through the arms while pressing the tops of the feet down, shoulders back. This puts the breaks on the hips, and delivers an elongation through the front of the spine.
It may also be useful to keep the backbend in upward dog modest, and focus keeping the shoulders over or behind the wrist in the transition from chataranga to upward dog.
Downward Dog – Another trick may be walking the feet in a little bit closer in downward dog. This may allow the heels to come closer to the floor so more weight is distributed through the legs, and less is taken by the arms and hands. At least do this during the healing process to avoid aggravating the injury.
The finger position can also be tweaked here. Keep that L position in the hands, with the index finger and mound of thumb pressing firmly into the floor.
Another thing to try is turning the index finger in toward the centre, just a little bit, say 5 degrees or so.
There is no one-size fits all answers to alignment here. But do experiment with these approaches.
Get a quality yoga mat – low end mats hurt wrists
If your mat cost less than 40 bucks, that harmless looking piece of rubber might be hurting you. Softer mats may be fun to roll around on, but if you’re jumping around or hanging out in downward dog, the hands sink right through them. I recommend a firmer surface like the Manduka Pro Lite mat (about $70). In my opinion, these types of mats should be a prerequisite for practising Ashtanga and Power yoga!
Yoga instructors with sore wrists
Lay off the adjustments a little if you’re someone who adjusts people a lot. The respectful action of pressing on people with our palms instead of giving them the creepy fingers can contribute to wrist pain. Another option is getting creative with the other body parts, and use your feet, chest, and legs to adjust when you can.
Also, do not demo any poses when you are teaching! That might sound drastic, so start by demoing half as much, then gradually cut it back. Adjusting is much harder work than we probably realize, because it is our wrists that tend to take the biggest beating.